
Stripe is one of the most popular and reliable payment providers in the world, allowing you to easily accept payments by credit card (including Apple Pay and Google Pay) from anywhere in the world. Integrating Stripe with Botconsole allows your customers to pay for goods, services, or digital subscriptions directly during a conversation in Telegram, WhatsApp, or other messengers.
In this guide, we will cover the entire process: from correctly registering an account that will not raise suspicions with the security service to technical setup and launching recurring payments.
💡 Read also: Monetizing Telegram Bots with Botconsole: The Complete Guide to One-Time Payments and Automated Subscriptions — Explore proven payment and subscription monetization strategies for Telegram bots • 10 mins read
1. Registration and Moderation: How to Avoid Blocking
Stripe has strict security rules. Sales through messengers often raise suspicions with automatic filters, as this is a "closed" ecosystem — the moderator cannot simply click a link and study the store's showcase. To ensure your account passes verification successfully, your business must be as transparent as possible.
How to Properly Describe Your Business (Business details)
The main rule is clarity and honesty. Do not try to hide that you are selling through a bot.
- ❌ Incorrect: "I sell digital goods and access to a closed club." (Too vague)
- ✅ Correct: "We provide educational consultations and sell access to premium content. Interaction with customers and payment processing occurs through our official Telegram bot. After successful payment, the customer automatically gains access to the materials in the messenger."
Mandatory Presence of a Website
Even if 100% of customers buy directly inside the bot, Stripe requires a functioning landing page. For Stripe, this is confirmation that you are a real business. A simple landing page (for example, on Tilda or Taplink) is sufficient, which must include:
- Clear product description: What exactly you are selling.
- Pricing: Clearly stated cost of services.
- Contact information: Support email (preferably on your domain) and phone number.
- Link to the bot: A "Buy in Telegram" button to connect the website with your actual sales channel.
Legal Pages (Critically Important!)
In the footer of your website, there must be links to three documents:
- Terms of Service: Rules for using the product.
- Refund Policy: Conditions for refunds or a clear statement that digital goods are non-refundable.
- Privacy Policy: How you handle user data.
What to do if your account is suspended for review? Write to Stripe support, attaching a link to your bot and a short video (screencast). In the video, show the entire customer journey: how they click the button in the bot, how the payment link is generated, and what happens after the transaction. Usually, after this, restrictions are lifted within 24–48 hours.
2. Technical Integration: Connecting Keys and Setting Up Webhook
For Botconsole to generate payment links and automatically grant access after payment, API keys and Webhook are used.
💡 Read also: Webhooks & Custom API Nodes (No-Code Power) — Learn how to extend no-code flows with webhooks and custom API requests • 3 mins read
Step 1: Where to Get API Keys
API keys allow Botconsole to communicate securely with your Stripe account.
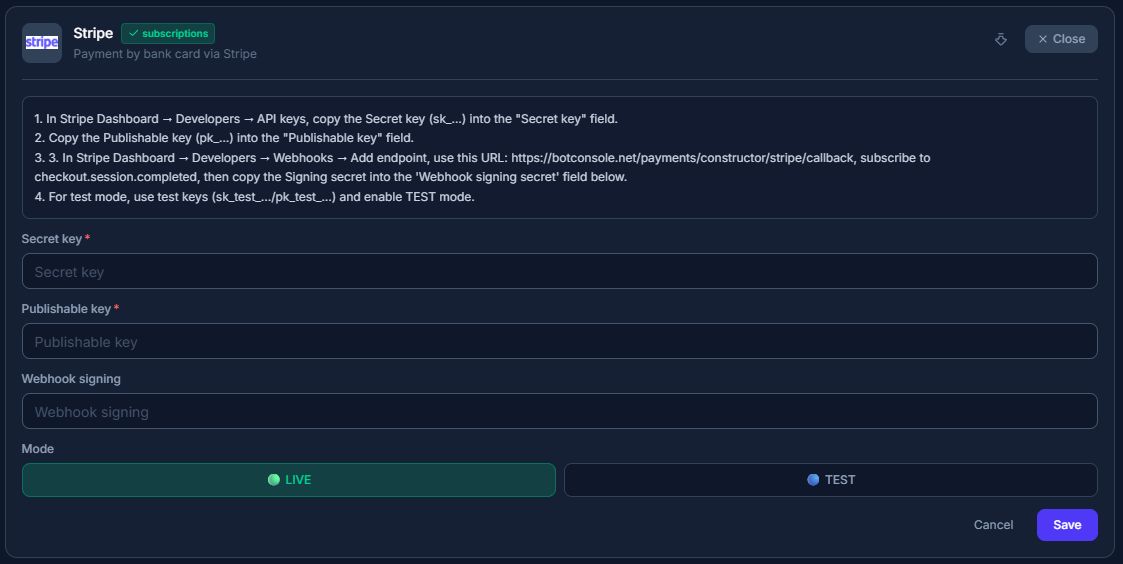
- Go to the Stripe dashboard.
- In the upper right corner, go to the Developers section, then to the API keys tab.
- In the Standard keys block, you will find:
- Publishable key (starts with
pk_live_...). - Secret key (starts with
sk_live_...— click Reveal test/live key to see it).
- Copy both keys and paste them into the corresponding fields in the integration settings within Botconsole. Never share the Secret key with anyone!
Step 2: Setting Up Webhook — Why Is It Needed?
While the keys allow you to create a link, the Webhook allows the bot to know that the payment has been successfully completed. Without it, the money will go to the account, but the bot will not deliver the product to the customer.
- In the Developers tab, go to the Webhooks section and click Add an endpoint.
- In the Endpoint URL field, paste the special link from the bot settings in Botconsole.
- Click Select events and choose the events that Stripe should notify the bot about:
checkout.session.completed— successful one-time payment or subscription sign-up.invoice.paid— successful recurring charge (for subscriptions).invoice.payment_failed— error during subscription charge.
- Click Add endpoint.
Step 3: Webhook Secret Key (Signing secret)
On the page of the created Webhook in the Signing secret block, click Reveal. Copy the key (starts with whsec_...) and paste it into the Webhook Secret field in Botconsole. This will protect your bot from fake payment notifications.
3. Setting Up Subscriptions (Recurring Payments)
Selling access by subscription is a popular model in bots, but it requires special attention to Stripe's rules. The main rule: the customer must have the ability to easily cancel the subscription at any time.
🧩 Use a ready-made free template: Telegram bot for paid access to a channel or group — Launch a subscription bot for paid access to your Telegram channel or group • 2 uses
If you simply charge money but do not provide the customer with a convenient tool to unsubscribe, they will go to their bank and initiate a Chargeback (refund through the bank). A large number of chargebacks will lead to irreversible blocking of the Stripe account.
Mandatory Rule: Customer Portal
Stripe provides a ready-made solution — Customer Portal. This is a special secure page where the customer can view their payment history, change the linked card, or cancel the subscription.
How to properly implement this in the bot:
- Create a menu item: In the main menu of the bot or in the user profile settings, there must be a button (for example, "Manage Subscription" or the command
/unsubscribe). - Link the button to the portal: When this button is pressed, Botconsole should generate and send the customer their unique link to the Stripe Customer Portal.
- Set up the portal in Stripe: In the Stripe dashboard, go to Settings → Billing → Customer portal and configure what the customer can do on this page (for example, allow subscription cancellations).
Having such a button in the bot is a mandatory condition for long-term and safe operation with Stripe.
4. Test Mode and Launch
Before launching real traffic, be sure to test the entire chain in safe mode.
- Turn on the Test mode toggle in the upper right corner of the Stripe dashboard.
- Use test API keys (they start with
pk_test_...andsk_test_...) in Botconsole. - Generate a payment link in your bot and use a test Stripe card for payment (for example, the number
4242 4242 4242 4242, any future date, and any CVC). - Ensure that the payment went through, the webhook was triggered, and the bot correctly granted access.
After successful testing, switch Stripe and Botconsole to Live mode, update the keys to live ones, and start accepting real payments!


Terms of material usage
Full or partial copying of materials is allowed only with an active and indexed link to the original source: https://botconsole.net/blog/en/17/how-to-connect-stripe-for-accepting-payments-in-telegram-bots-complete-guide-and-secrets-of-successful-moderation