
In conversational bots, the way you structure your dialogs directly affects how many users become paying customers. Whether you run an e-commerce shop, qualify sales leads, or handle customer support on Telegram, WhatsApp, or the web, small differences in your copy, tone, or button layout change your conversion rate.
🧩 Use a ready-made free template: AI-powered sales support bot — Start testing a conversion-focused AI sales flow right away • New template
Designing a scenario once based on gut feeling and never testing variations leaves money on the table. When you use AI agents and large language models (LLMs) like OpenAI, Claude, Gemini, or Grok, testing becomes even more important because prompt wording and agent instructions directly change how users interact with your bot.
A/B testing lets you compare different bot scenarios on real traffic, track goal completions, and see which variant actually works.
1. Why scenario testing matters for AI bots
A/B testing (split testing) divides your incoming audience between two or more branches of a funnel to measure which path leads to more target actions.
With traditional rule-based chatbots, tests usually compare button labels, text lengths, or media attachments. With AI-driven bots, testing helps solve several specific problems:
- System prompt and tone adjustments: An AI agent's replies depend on its system instructions. You can test a direct, concise assistant against a consultative persona to see which one converts more leads into paying customers.
- AI chat versus structured button menus: Some users prefer open-ended conversation, while others want fast, one-tap buttons. Running an A/B test allows you to measure an AI conversational flow against a structured inline menu or a hybrid setup.
- Model comparisons: You can route traffic between different models (such as GPT-4o, Claude 3.5 Sonnet, or Gemini 1.5 Pro) to compare response quality, speed, and downstream conversion rates.
💡 Read also: How to choose the best AI model for your business assistant: balancing quality, speed, and cost — Choose the right AI model before measuring its conversion impact • 8 mins read
2. Why the welcome message determines conversion rates
The first interaction (the /start command or the initial widget greeting) sets the tone for the entire user session. Users decide within seconds whether to continue interacting with your bot or close the chat.
Because onboarding has a direct impact on subscriber retention, it is worth testing multiple variations of your initial message:
- Tone of voice: Test a formal introduction against a casual or question-based opening.
- Message length: Test a short two-line greeting with an image against a detailed overview of your features.
- Call-to-action buttons: Compare different button texts, such as "Get started", "Browse catalog", or "Ask AI assistant".
- Lead magnet vs. direct onboarding: Test offering an immediate downloadable guide or discount code against walking the user straight through setup questions.
3. How to set up the A/B test node
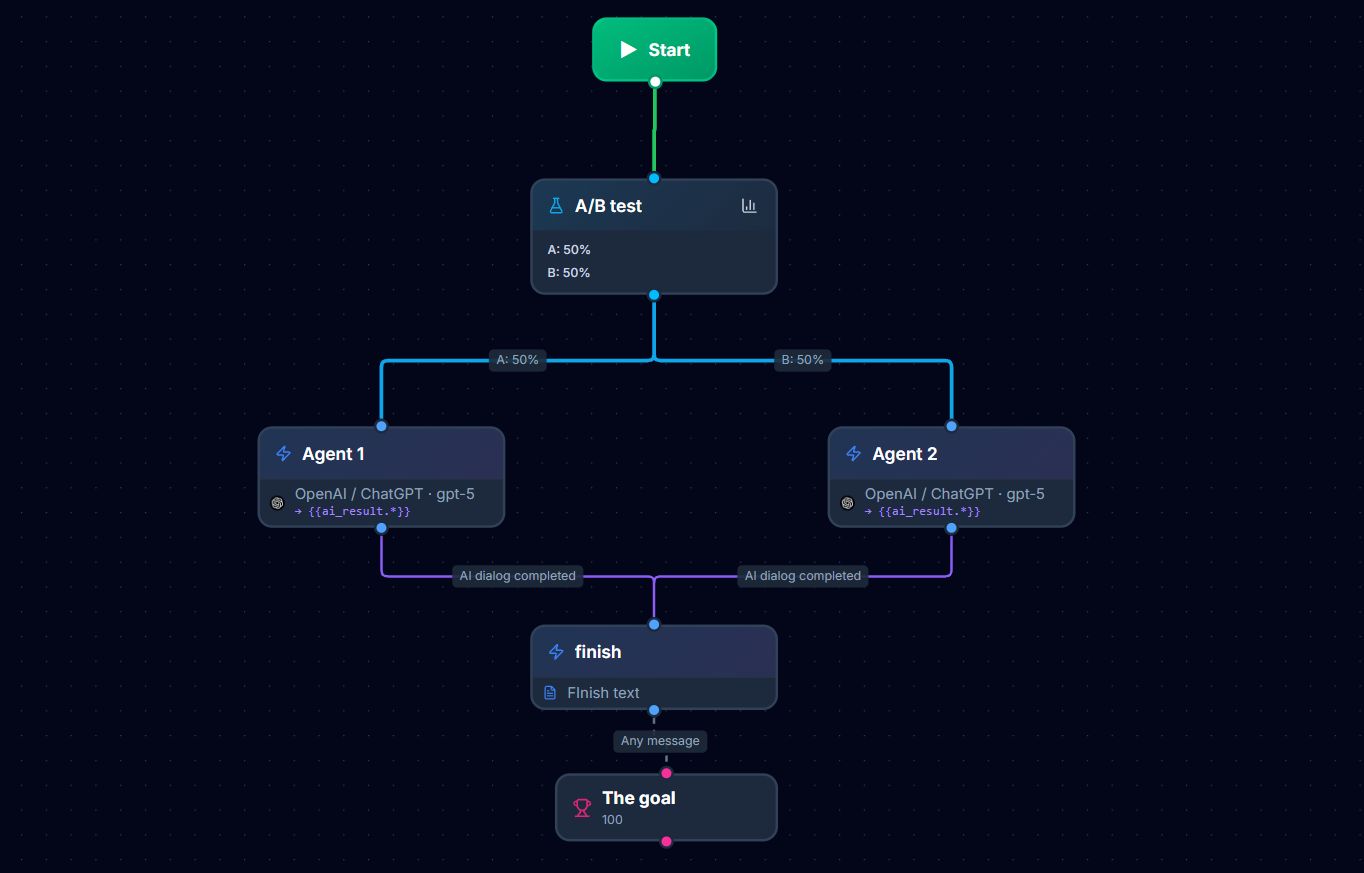
Botconsole includes a dedicated visual node for split testing on the canvas.
       ┌────────────────────────┐
       │   A/B Test Node        │
       │   Variant A: 50%       │
       │   Variant B: 50%       │
       └───────────┬────────────┘
                   │
         ┌─────────┴─────────┐
         ▼                   ▼
┌──────────────────┐  ┌──────────────────┐
│  Welcome Flow A  │  │  Welcome Flow B  │
│  (AI Assistant)  │  │  (Button Menu)   │
└────────┬─────────┘  └────────┬─────────┘
         │                     │
         └─────────┬───────────┘
                   ▼
       ┌────────────────────────┐
       │ Conversion Node        │
       │ Goal: "Qualified Lead" │
       └────────────────────────┘
Setup steps:
- Click the flask icon in the top toolbar to place an A/B Test node on your canvas.
- In the node settings, assign the percentage of traffic each branch should receive (for example, 50% to Branch A and 50% to Branch B). The total must equal 100%.
- If you want to test more than two variations, click Add test to add up to 10 branches.
- Connect each branch output to the command or scenario you want to test.
- Sticky routing: When a user enters a branch, Botconsole keeps them on that branch permanently. If they send
/startagain later, they stay in the same variant so their experience remains consistent.
4. Tracking goals with the conversion node
An A/B test needs a clear success metric. The Conversion node (trophy icon) marks the exact point where a user takes the action you care about, such as submitting contact details, completing a quiz, or making a payment.
How the conversion node works:
- Non-blocking tracking: The node logs the goal in the background and immediately moves the user to the next step in the flow without pausing the conversation.
- Goal name: Give the goal a descriptive name, such as
Left contact infoorPaid order. - Goal value: You can add a static numeric value (such as
50) or use dynamic variables from previous blocks (such as{{order_total}}). - Count once per user: Turn this toggle on for one-time actions like account registration, or leave it off for recurring actions like repeat purchases.
- Automatic attribution: When a user reaches a Conversion node after passing through an A/B test, Botconsole automatically credits that conversion to the corresponding test branch.
💡 Read also: Chatbot CRM: Track Leads, UTMs & History — Connect conversion results with lead history and campaign context • 3 mins read
5. Viewing analytics directly on the canvas
You can inspect the performance of your tests directly inside the visual builder without exporting spreadsheets.
Canvas statistics mode
When you switch the builder to statistics mode:
- The A/B test node displays the total user count and percentage for each branch.
- Outgoing connection lines show the conversion percentage for that path.
- Button click counts and user drop-off points appear across all blocks in the scenario, showing where users pause or drop out.
Analytics modal
Clicking the chart icon on the A/B test node opens a detailed view:
- Summary table: Shows total visits, conversion counts, goal values, and win rates for each variant.
- Daily trend chart: Shows performance over time so you can verify if a lead is consistent or just a short-term spike.
- Goal switcher: If your scenario contains multiple conversion nodes (such as
Started demoandPaid), you can switch goals in the dropdown to compare step-by-step funnel drop-offs.
CRM integration
Inside the Chats section of Botconsole:
- When a user triggers a conversion node, a notice appears in their conversation history.
- The contact profile panel displays an A/B Tests section showing every test the user took part in, along with their reached goals.
6. Example: testing an AI prompt against a button menu
Here is a common split test setup comparing an open-ended AI assistant to a fixed navigation menu:
| Parameter | Variant A (Conversational AI) | Variant B (Button menu) |
|---|---|---|
| Hypothesis | An AI assistant answering open questions will lead to faster consultation bookings. | Users prefer clear buttons over typing messages. |
| Welcome message | "Hi {{user.name}}, I'm your AI assistant. Tell me what service you're looking for, or ask any question." | "Hi {{user.name}}, choose an option below to get started." |
| Interface | Text input routed to an AI Dialog node. | Inline buttons: Book consultation, View pricing, FAQs. |
| Goal | Conversion node: Booked consultation. |
Conversion node: Booked consultation. |
| Metric | Conversion rate (%) and total bookings. | Conversion rate (%) and total bookings. |
Running this test across a few hundred users will give you clear data on which approach drives more actual bookings.
7. Practical rules for bot experiments
- Test one element at a time: If you change your welcome copy, button layout, and pricing structure all at once, you will not know which change improved your numbers.
- Collect enough traffic: Avoid stopping a test after 15 or 20 visits. Aim for at least 100 to 300 users per branch before picking a winner.
- Do not modify branch weights mid-test: Changing percentage weights while a test is running distorts your historical conversion rates. If you need new proportions, use the reset button to start a clean test.
- Place conversion nodes at multiple steps: Using conversion nodes at several points in your funnel (such as viewing pricing, submitting a form, and completing checkout) helps you see where users lose interest.
Summary
Testing your scenarios replaces guesswork with measurable conversion data. In Botconsole, you can set up split tests with the A/B Test node, record milestones with the Conversion node, and review click data directly on the builder canvas.


Terms of material usage
Full or partial copying of materials is allowed only with an active and indexed link to the original source: https://botconsole.net/blog/en/21/how-to-test-bot-scenarios-and-improve-conversions-with-botconsole